Far Far West Knuckle Dusters Build: Melee Healing, Shields & Jokers

Explore a Far Far West Knuckle Dusters melee build with kill healing, shields, Bloodlust, and Ritual, Blizzard, and Cube. Includes the featured loadout and its real combat limitations.
This Far Far West Knuckle Dusters build turns melee kills into recovery. The featured loadout combines healing, shield generation, and stacking attack speed, then uses Ritual, Blizzard, and Cube to support close-range fighting.
It is a build demonstration, not a guaranteed-clear setup. The creator shows impressive recovery during ordinary fights, but the run ultimately ends in a death. Here is the loadout explained in the video, what makes its sustain work, and where it struggles.

Knuckle Dusters Build at a Glance
| Component | Featured choice or effect |
|---|---|
| Main weapon | Knuckle Dusters |
| Ranged backup | Revolver; the creator also discusses Bow |
| Melee recovery | Melee kills restore 2 HP |
| Shield generation | Melee kills grant 1 shield point |
| Attack-speed engine | Bloodlust: melee kills grant stacking melee speed |
| Additional damage | Low-health melee damage and a brief damage bonus after HP damage |
| Hero support | Kill healing, overhealing converted to shields, and an emergency low-HP shield effect |
| Spells | Ritual, Blizzard, Cube |
| Equipment discussed | Impulse and Bottle Crate; Bottle Crate is being tested |
These are the choices described in this particular video, not a claim that every option is mandatory or optimal across later balance patches. Some Joker names are unclear in the automatic transcript, so the guide describes their effects rather than inventing names.
Weapon Jokers: Healing, Shields, and Bloodlust
The main melee package rewards getting kills with Knuckle Dusters. The creator describes a Joker that heals 2 HP per melee kill and another that grants 1 shield point per melee kill.

Bloodlust adds the attack-speed layer. Its visible tooltip states that melee kills grant a stacking +5% melee speed for 5 seconds, up to +50%. This is a temporary combat buff, not a permanent speed increase for the rest of the mission.
The idea is to keep landing melee kills while the buff is active: kills provide recovery and shields, while the increased attack speed helps maintain pressure. That makes groups of weaker enemies useful for sustaining the build, provided you can finish them safely.
The creator also describes up to 50% additional melee damage as HP gets lower and a 20% damage bonus for 3 seconds after taking HP damage. These effects add damage under pressure, but do not make deliberately taking hits risk-free.
Hero Jokers: A Second Layer of Recovery
The hero setup adds more support around the weapon's on-kill effects. The creator describes kill healing with a 30% maximum-HP reduction, an overhealing-to-shields effect with a stated 15-point cap, and a simple 10% melee-damage bonus.

Fight or Flight is readable in the footage: taking HP damage grants +20% melee speed for 3 seconds. The creator also describes an emergency effect that grants 50 shield points when HP reaches 25%, with approximately a one-minute cooldown.
That emergency shield should be treated as a limited recovery opportunity, not something that protects you during every fight. Likewise, reduced maximum HP means a build can recover quickly while still having less room to absorb a large hit.
The video does not clearly establish how every healing effect stacks or the total HP restored by each kill. Check your equipped tooltips rather than assuming a combined healing value.
Spells: Ritual, Blizzard, and Cube
The featured spell selection is Ritual, Blizzard, and Cube. The creator says spell choice is a matter of preference, but particularly likes Ritual plus Blizzard for rapid health recovery and additional shields.

That recovery claim is the creator's account of the featured setup, not a measured guarantee for every loadout. The video does not provide a full breakdown of every upgrade involved, so copying the three spell names alone may not reproduce the exact result.
The practical lesson is to support your melee weapon with a recovery plan. Do not spend every tool simply to deal damage if it leaves you unable to recover when a close-range fight turns against you.
How to Play the Melee Sustain Loop
The build's basic rhythm is to close on manageable enemies, secure melee kills, and keep moving as HP and shields recover.

A useful way to approach the featured setup is:
- Start with enemies you can safely finish in melee.
- Use those kills to activate recovery, shields, and Bloodlust.
- Watch the health bar instead of assuming sustained aggression is always safe.
- Use your supporting spells when recovery from kills is no longer enough.
- Switch to the ranged backup when approaching a target would expose you to unnecessary damage.
Those playstyle suggestions follow from the build's reliance on melee kills. They are not a claim that the video demonstrates a flawless rotation.
What the Gameplay Shows About Recovery
During the run, the creator repeatedly comments on how quickly health returns and briefly feels almost impossible to kill. That is the appealing part of the build: recovery can make ordinary combat feel much more forgiving.

However, that feeling is not the same as invulnerability. A kill-based recovery build still needs targets it can finish. If an enemy survives your attacks or forces you away, the recovery loop can stop at exactly the moment you need it most.
Weaknesses: Elites, Incoming Fire, and Burst Damage
The creator calls out an enemy's shield bash as frustrating for melee and later discusses an elite that deals heavy damage. These moments show why close-range sustain still needs careful target selection.

The run eventually ends with the creator dying. Their closing comments mention the saloon and snipers and cite roughly 36,000 damage. The later automatic transcript is noisy, so this guide does not assign a precise sequence of causes to that final encounter.
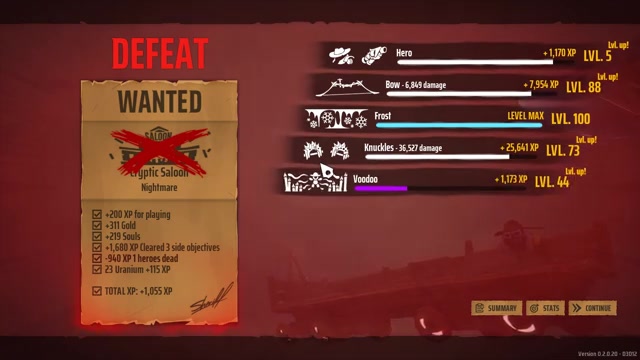
The important takeaway is straightforward: fast healing and shield generation do not guarantee survival. Ranged pressure, difficult elites, and situations where you cannot secure kills remain meaningful threats.
Is This Knuckle Dusters Build Worth Trying?
Try this setup if you enjoy aggressive melee combat and want kills to contribute directly to survival. The combination of healing, shields, and temporary attack-speed buffs gives Knuckle Dusters a clear identity beyond simply punching faster.
Keep a ranged backup and respect the build's limitations. The video is useful because it shows both the strong recovery moments and a failed run, rather than presenting the loadout as unbeatable.
For the full loadout explanation and gameplay run, check the